Pre-writing skills - tips and advice
For a child to be able to write and form letters properly, they need initially to learn how to copy and form simple shapes. Copying the marks or shapes drawn by parent or teacher, is important because it helps a child learn hand eye coordination. Make scribble drawings with the child. After allowing time for the child to make their own marks, then demonstrate making marks such as – | O and get them to copy.
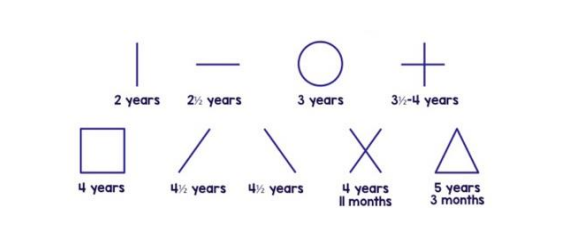
It is important for children to be able to draw the 9 pre-writing shapes shown below before they
move onto more complex shapes like letters. If a child is unable to make the basic marks they are
not likely to be successful at writing letters. If you can’t draw a diagonal you are unlikely to be able
to draw a triangle or reliably form a ‘w’

Therefore, it is important to make mark making fun, providing the child with lots of different
experiences and encouraging them to experiment and improve. We describe this as a multi-sensory
approach to mark making.
Strategies
These activities have been put together to practice and improve pre-writing skills. They can be
carried out in any order and should ideally be practised about three times a week for 15 minutes.
- Encourage large movements when making marks, this encourages use of the muscles of the
whole arm and shoulder against gravity and helps to reinforce the ‘‘mental picture’ of the
pattern. This is recommended at the early stage of learning letter formation for example
draw large shapes in paint on an easel or paper pinned to the wall or draw giant shapes in
the air Use thick paintbrushes and buckets of water to paint on outdoor surfaces. - Talk to the child about what they are doing in order to draw their attention to the
movement, for example: a square goes down, across, up, across. - Maze activities: Start with getting the child to walk on large shapes/lines on the floor
(masking tape or chalk) and drive toy cars through mazes, over lines and diagonals. Then
encourage drawing between a horizontal or vertical path. Gradually decrease the width of
the maze to encourage increased control. These can be done with finger paints, crayons,
pencils or paints on a table, at an easel or on paper on the floor or pinned to the wall - Grade how much help you give the child. Initially you may need to use a hand over hand
approach but try to reduce how much physical and verbal help you give the child so they
become more independent - Always emphasise that work should be from ‘Top to Bottom’ and ‘Left to Right’
- Try drawing on sandpaper, patterned wallpaper, in sand or mud in shallow trays
- Draw in lotions, whipped cream, icing sugar, chocolate spread or shaving foam
- Experiment with different colours of chalk, markers, crayons, pens, pencils and paints
- Draw on cakes with coloured icing tubes or draw with cheese spread on bread or crackers,
Make shapes with noodles or spaghetti - Try outdoor activities such as rubbing over different textures e.g. concrete, brick or bark
- Use short regular pencils, small pieces of chalk, felt markers and crayons, this helps the
development of finger control - Start to make a link for children between pre-writing shapes and marks and letters e.g. a
circle is the same as an ‘o’ - Practice dot to dots. Encourage the child to stop on each dot. Use arrows to indicate the
next dot to improve forward planning and direction - Make shapes and lines out of rolled up play dough
- Don’t focus too quickly on forming letters, try to make drawing fun!